
Out of all the marketing tools that have been created for online marketing, Facebook pixel stands out as the best helping hand. The Facebook pixel allows its user to accurately monitor how successful were their previous ads and can create different types of audiences based on the traffic attracted by the site.


The importance of pixels reflects the fact that if your site is not converting well, then the only parameter that needs to be worked on is none other than ‘Facebook pixel’.
Some marketers create ‘LAL’ also known as lookalike audiences, which is a great way to dynamically target a good quality audience. You just have to pick up the right source for your lookalike, make sure you have got the best quality and audience size.
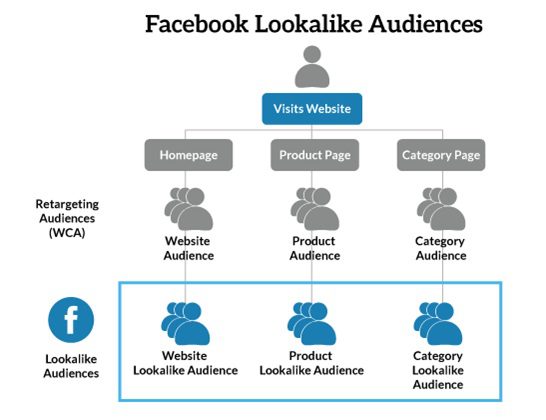

In Lookalike audience, marketers target people that look exactly like your set of the target audience. It takes a matter of seconds to create a set of lookalike audience for you and use it. If you have a newsletter of several people and just a bunch of them have bought from you then the rest of them can be used to create a lookalike audience.
Normally Facebook pixel is used to track the number of leads, sales, and registrations that you get from your ads. You can also deploy it to create some re-targeting campaigns for their target audience.
It also helps you not only to get traffic but also optimize your ads for better conversions. It helps you run ads of dynamic products and also lets you know about the sales of the revenue that was generated.
Table of Contents
Why you need Facebook pixels in your business?
![]()

- Create action-specific Ads for people who have interacted with the ad once or more than that.
- Analyzing the sales funnel helps you with conversion per action. For example in e-commerce, business ratios are compared between the number of people clicking on your ad and people who added any product to their cart.
- ROI’s are measured well when the profit of sale is matched by ad-spend.
- You can reach target specific visitors on your website with the desired product they clicked.
You have to be very realistic and mature while setting up goals for your campaigns and potential customer. To become good at deploying Facebook pixels and getting the most out of it, you have to master targeting the right people and also connecting with them in your ads, and finally giving them a realistic call to action.
Creating your first ever Facebook pixel
Creating your first Facebook pixel may sound like a daunting task initially, but once you get your hands on it, creating a pixel and installing it to get results would be very easy. Keep in mind that every pixel has its own 15 digit ID that you need to install on your pages on the sites which you want to track.
There are several ways to create a Facebook pixel and we would be proceeding through to 2 ways –
- Ads Manager
- Through the Business manager.
Creating Pixels with the help of Ads Manager
Step 1 – After you’ve opened the Ads manager page on the top left corner, you will see a drop-down menu on which you have to click on ‘all tools’ which is in the last option. There click on ‘Pixels’.
Step 2 – You will land on the pixels page, there click on ‘Create a pixel’
Step 3 – Now all you have to do is name the pixel and you will be creating your first pixel.
Creating Pixels with the help of Business Manager
![]()

Step 1 – When you open Business manager, go to section of pixels on left hand side menu, you will find a ‘Create a new Pixel’ option.
Step 2 – Repeat the last step of the Ads manager method and name the pixel.
Always remember you can create only one pixel per ad account. So after you’ve created your first Facebook pixel, don’t forget to assign it to your ad accounts so that it can be used in your ad campaigns.
Installing your Pixel on Sites
![]()

After you create your first Facebook pixel you will want to set it up and as soon as you do that Facebook will present you with lots of options on how to do it. We will show you how to install Facebook pixel in manual ways.
Manual installation is the most popular and traditional way of installing pixels on your site or e-commerce store.
On the pixel page of your ads manager, you will see the option of setting up a pixel, click on it. As soon as you click on the button you will see three different options go ahead and choose the one which has “Install manually’ written over it.
You will see a big box with a big code written. Go ahead copy it, it’s your pixel. You just have to go to every individual page you want to track and paste the code on the header of the site.
Always Audit Your Pixels
![]()

Sometimes you can face problems when your pixel is installed. It means on the certain site, when you re-target the same audience, again and again, you are just wasting more money. Instead you can go and audit your pixel and change it to target a different type of audience.
You should protect your pixels and also learn about the regular change in data privacy policies. Pixel auditing is a regular part of an audit in certain businesses as it helps you reach a new audience and target consciously so make sure you do that.
Conclusion
The very fact that users have been given more control over data tracking should not discourage marketers as the Facebook pixel is still an invaluable tool when it comes to targeting and generating sales through it. One has to know the ins and outs of targeting before getting significant results from this.
You have to make sure that you install the pixels right to get the best desired results because that is the only way that Facebook optimizes your ads to the fullest. Marketing to any type of audience boosts your brand credibility and awareness that’s why, when it comes to segregating the leads in terms of their levels, pixels are very helpful.


")

